
So I'm going to say it Christmas time is almost here again. I know how much people like to try and make gifts so I have been doing some of these candles for gifts! They are very simple and easy!
Here is what you need to do this project...Rubber bands, a colorful try(got mine from Michael's craft), spry paint and clear glass candle holders( I got mine from dollar tree).

1st step: scrap off the price stickers on the bottom of your class candle holders & clean with glass spray..wait till dry
2nd step: Wrap rubber band at different angles & ways around the glass! Sorry I do not have a picture for this step yet.
3rd step: Flip candle holders upside down on your card board just separated enough from each other. Apply one coat of your spray paint. *note that you need to hold the can far enough away so that you don't create drip marks.
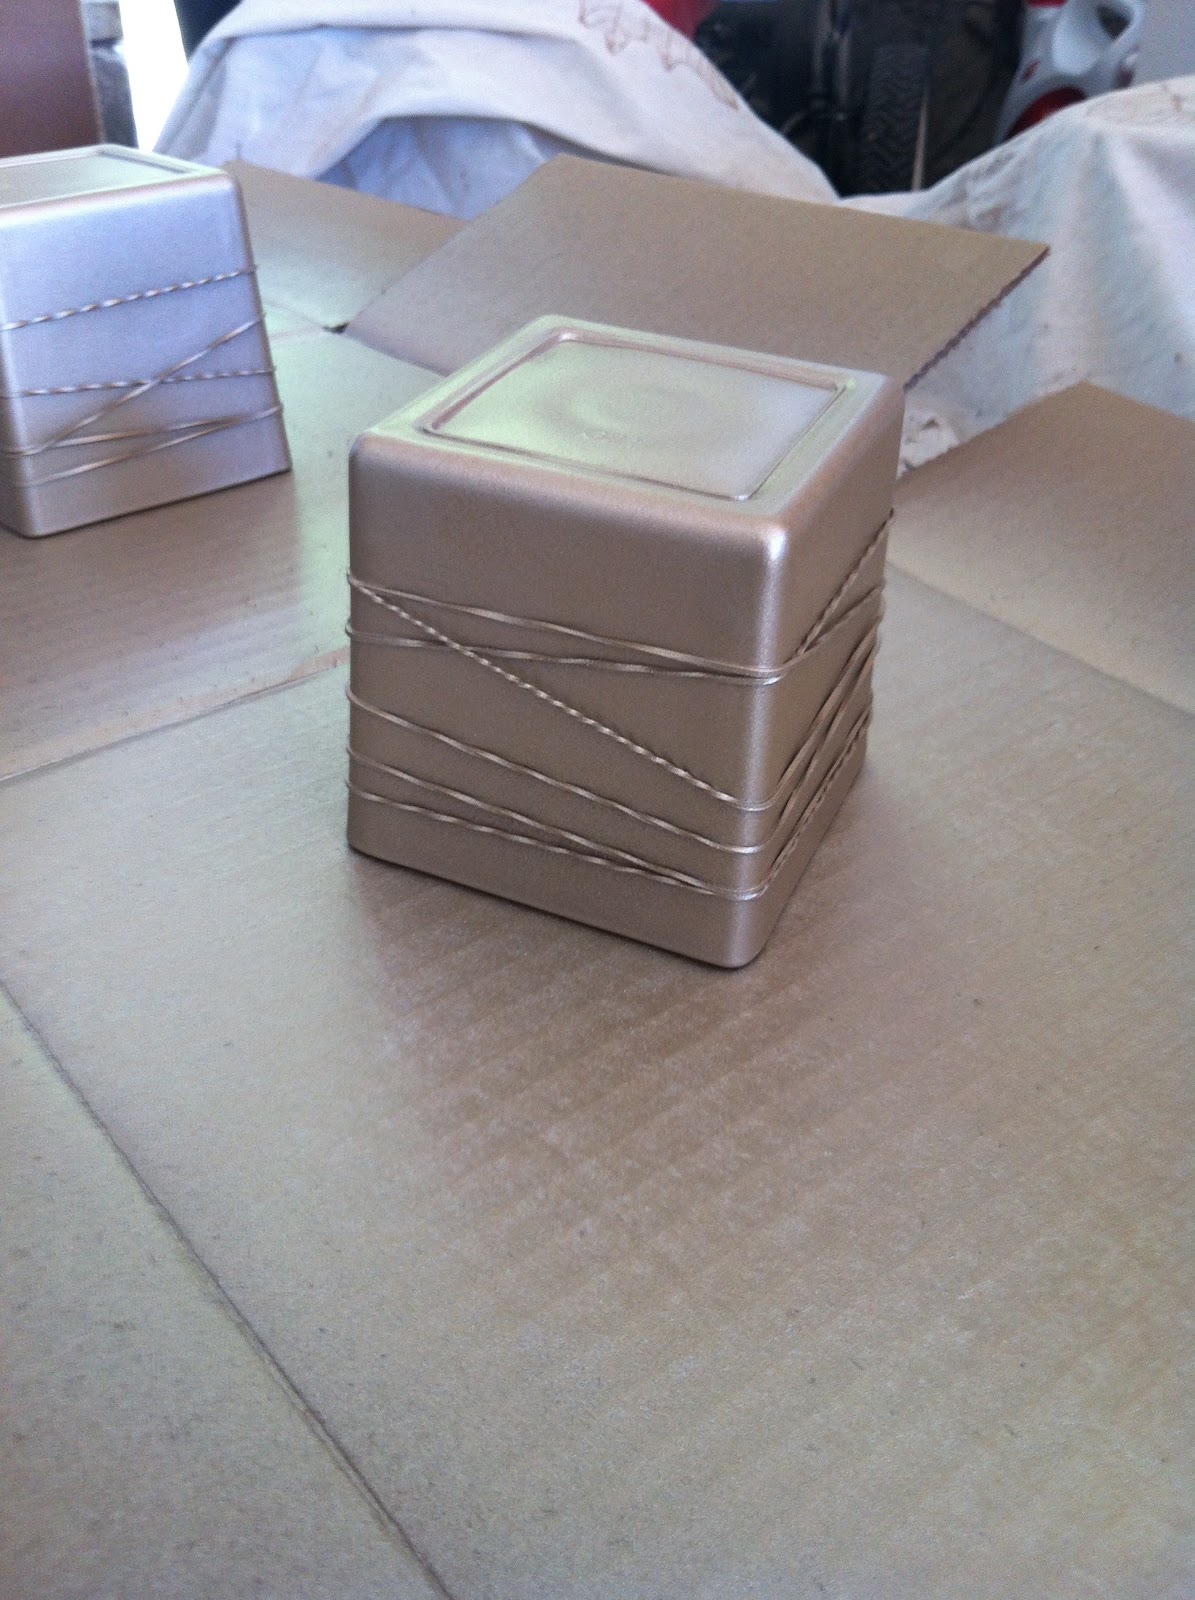
4th step: Let dry and apply several more thin coats of spray. You need the candles dark enough so that when you pull the rubber band off & put a tea light in the light only shines through the rubber band marks.
5th step: After completely dry (I let sit a day) carefully remove the rubber bands. *Remove rubber bands over a garbage bag, the spray paint on the bands will flake off and leave a sticky mess. Gently wipe glass with a dry paper towel just to remove flakes. Your Done!!

 |
| Look how cute! |
Aug 26th 2012
Made my 1st dipper cake for Mikes sisters baby shower and it came out stinking CUTE! if I do say so myself!
 |
| starting out |
 |
| two layers done |
 |
| three layers |
 |
| complete! |
 |
| Music box stuffed giraffe & mobile |
June 21st 2012
Back at it again taking on 2 projects at a time! Keeps me out of trouble though and gives me always something to do! 1st off I'm making another baby quilt, yes yes another one! This time its for a girl, Mikes sister is having a little girl due in August and its the very 1st baby of the family! I'm excited very very excited! Here is the beginning...
 |
| The rough sketch of what the quilt will look like. |


 |
| One of the many differant squares |
 |
| Without border done |
.jpg) |
| Without border done |
The second thing I am currently working on is turning a cupboard into a rolling island. I found the perfect thing on craglist paid $60 bucks for it and now its becoming a master piece lol! The before pictures! It dose have a drawer to it but I got over excited and started taking it a part before I took before pics lol!


So I took off all the hard wear and the top crowning cause I don't like it. Now its time to sand it and stain it a coffee color I picked out!
 |
| 1st coat of stain on and already looking better |
 |
| complet looks worn & I love it |
 |
| fits perfect! |
 |
| Already has all my cookbooks & cupcake stuff stored! |
Feb 24th 2012
I did another quick little painting project in my salon with the owner that took about 9hrs but it was totally worth it! We repainted our shampoo room and redecorated it! A much needed upgrade after we got our new shampoo bowls in!
 |
| Before |
 |
| After |
 |
| After |
A project that I recently started was a baby quilt. I have made a few quilts before, and my Grandma Mackey taught both me & my sister how to quilt. I how ever am no pro by any means, I can make very simple things. This quilt is one of the harder ones I have tried to do and I'm excited to see the end result witch makes me push through it faster!
The starting pattern...

This is the pattern that I found on the Internet and it looked like a lot of fun so I just had to try it! I had to scale it down to baby size so in total the quilt will be 3.5ft x 4ft. More of a toddler quilt you could say.
Chose my theme and picked out the fabric...

8 different patterns all with matching colors to compliment them! Ahoy Thar Matey!
My scaled drawing of the quilt...

I also drew in the patterns I had picked out and bought so that I could visually see everything laid out and so I had something to follow when it came time to start sewing all the cut pieces together!
 |
| The squares are all done, now its time for the final cut and than the fun part making the rows! |
Now its time to add the border.. and ill be so close to done!

Wednesday Feb 8th 2012
So now that I have all this going and I'm at the point were all the individual pieces are cut...I realize that I have over looked a little something. I made the blocks too small so most of my sewing is going to be done by hand. What I should have done when scaling down the quilt was still make the blocks the same size as the big quilt but make fewer of the blocks. Cause now I have 40 block that are very small in stead of 20 blocks that are normal size...I'm still excited to do the quilt and finish it, I just learned a good & important lesson!
So I had to take a small break in quilting cause I had another opportunity to do a quick project and I took it! I'm sanding and repainting our bathroom cabinets. When we move into our duplex it was quit the ordeal lots went wrong and things didn't not line up. Now its a long story but under the circumstances we excepted it, but now with it being 6 months later and somethings still are not taking care off...well I took things into my own hands. Our cabinets were painted a light color and they looked like the were painted by kids than destroyed by kids (not good)..I have painted the cabinet doors, draws and full cabinet now I'm just waiting to do a second coat! Before I'm finished ill give you some before picture to compare too!
 |
| The bad paint job and the nasty old look |
 |
| Hardware gone and almost prep completed! |
 |
| all sanded and ready for the 1st coat of paint |
Tomorrow is last coat of paint and putting on the new hard wear... and Bam its done and looks amazing!


They look so much better!
 |
| Before |
 |
| After |
No comments:
Post a Comment